About Profiles
Each profile page shows a print of the TruNeg Calibration Negative.
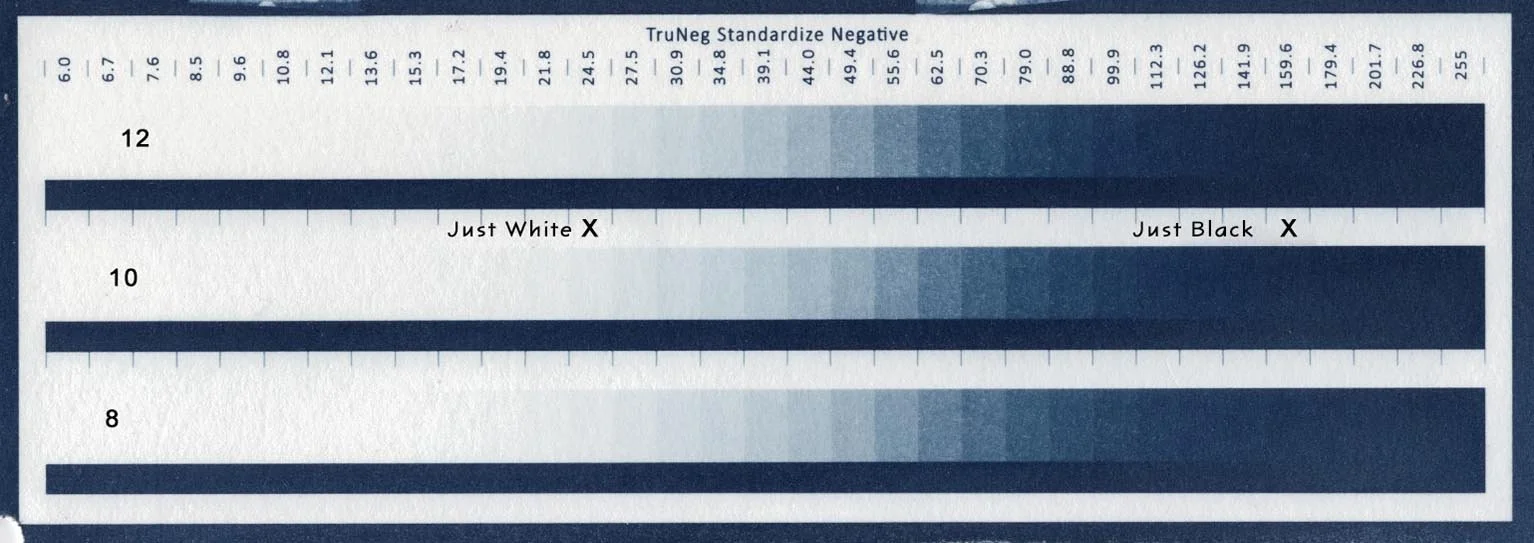
The Calibration negative contains three 16-bit, 32-step logarithmic stepwedges, ranging from RGB 6 to 255. If the printer prints each step correctly with an overall density range of 2.4 between RGB 6 and 255, each step will have a density difference of 0.075.
Because the Calibration Negative is a logarithmic stepwedge, the way different processes respond to exposure can be observed in the stepwedge, providing helpful information when tweaking.
Comparing the Van Dyke Brown test against the Classic Cyanotype, it can be seen that the overall contrast is very similar, with VDB requiring a slightly larger exposure range than the Cyanotype. The main difference is that the VDB toe is much shorter, reaching midtone at approximately one-third of the steps from the white point. In contrast, the Cyanotype has a much longer toe, reaching midtone with a band of high contrast at roughly the halfway point of the stepwedge.
When the profiles are plotted together, these differences are clearly visible. In the plot shown to the left, the short toe VDB curve is yellow, and the Classic Cyanotype curve is magenta.
About the Test Prints
The prints used to profile each alternative process were made through the traditional black-and-white darkroom practice of test stripping and should be viewed in that context; that is, the prints used to make the profiles were visually assessed as being “good” by John Riches at TruNeg, not by densitometric measurement.
Please note that, due to variations in printer, paper, and chemical properties, TruNeg cannot promise that using these profiles will produce the same print. However, the profile should provide a sound basis for producing a great print tailored to the individual's personal idea of the perfect print after one or two test prints.
Of course, this only has to be done once, since once a preset has been saved, it can be applied to all future prints, though caution and experience would suggest always testing a new image before printing.
Making a Profile
Profiles only need to be made if it is intended to be shared with another user, otherwise simply use the preset.
To make a profile, open the submenu in the Tweak menu, select the preset to be profiled, and, when required, provide a short suffix to be used to indicate which profile has been applied to the preset. For Example, if profiling a platinum preset, enter “Plt”.
A preset to be profiled must have all control points on a Log Positive RGB vertical grid line.
Profiles are stored as plus or minus the number of steps the profile varies from the inverted negative at the points selected on the positive grid line. This means that the profile values change proportionally with the printer contrast, as shown in the two plots to the left.
The upper plot is a preset from a low contrast negative with a range of 12.1 to 201.7 and a gamma of 1.02; the lower plot is the same preset applied to a negative with a range of 27.5 to 126.2 and a gamma of 0.55. Both plots show the preset crossing the same intersections; therefore, they are the same curve.
All prints shown on the Profile pages are made from negatives printed with a Canon iP8760 printer using generic Hot Toner inks on two Fixxon Waterproof Film sheets registered together. See Contrast Masks for details. The negatives were printed on Hahnemühle Platinum Rag using chemical kits from goldstreetstudios.com.au/.