Tweaking
What is Tweaking?
Tweaking is adjusting the plot of the digital negative preset to fine-tune the print tones. It is also used to create profiles of various processes that can be shared among TruNeg users.
Tweaking fundamentally alters the process of making prints from digital negatives. The direct link between grid lines and print tones allows the user to adjust the preset to predictably lighten or darken any tone or zone, whether for technical or aesthetic reasons, giving complete control over the print.

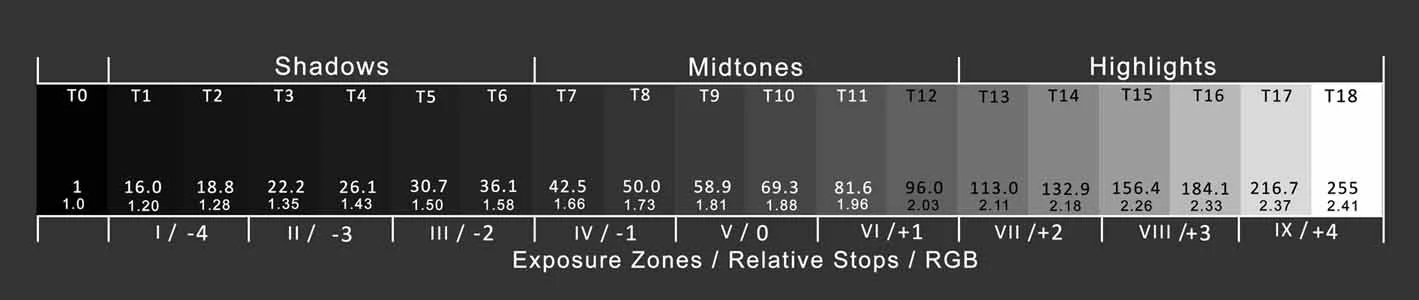
The plot axes are labelled in log 16-bit RGB. The corresponding 8-bit pixel values are shown within the plot area. To convert an 8-bit value to a 16-bit value, divide the 8-bit value by 255 and multiply by 65535.
Each grid line is notated with the tone T number, which corresponds to the step in the TruNeg stepwedge shown below the plot window. The reason the Y-axis notation is inverted is to match the DLogE convention of the negative becoming darker as the exposure increases.
The preset used to convert the negative is plotted as a solid yellow line. The unprofiled inverted file is plotted as a dashed blue line.
The preset is amended by clicking on the plot. Clicking below the preset curve darkens the print; clicking above lightens it. Points can be added anywhere, between points, dragged by holding down the left mouse button, and removed by right-clicking. The only limitation is that they cannot be closer than approximately half a grid space to each other.
The new preset is saved by clicking on or just below the line marked “Clear Film,” which corresponds to the negative pixel value RGB 255.
Description of the plot window
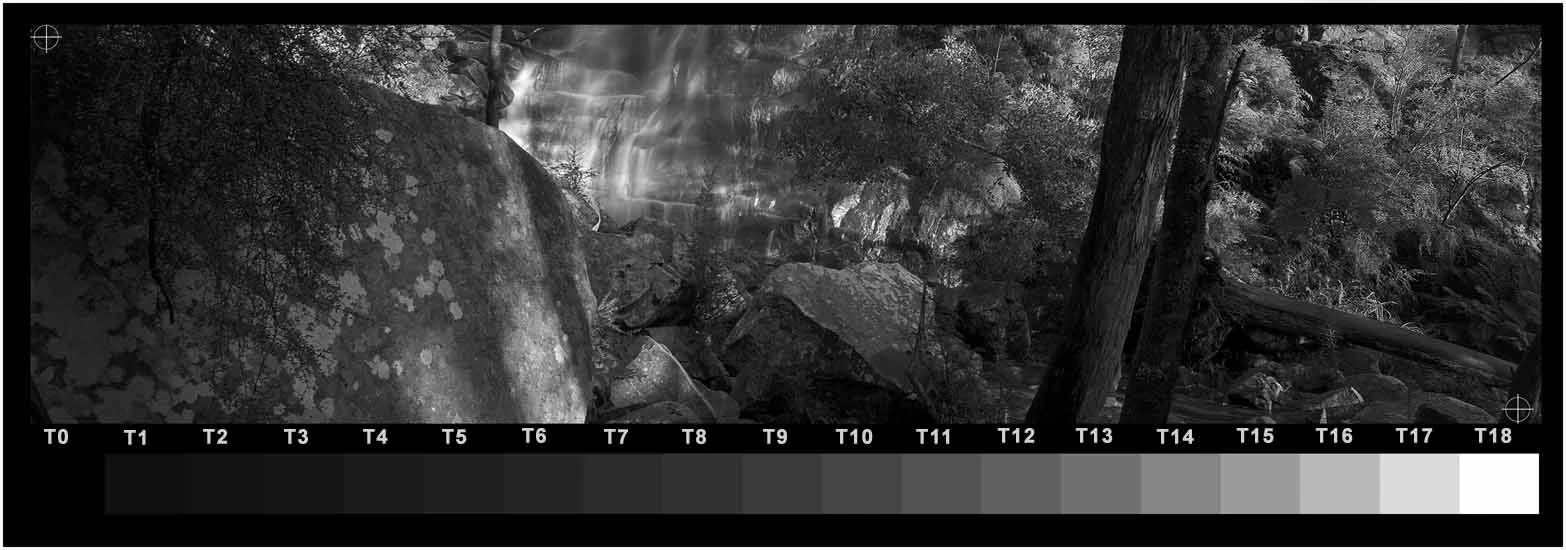
Tweaking Example
After an initial overall test print assessment, the first thing to check is the T1 and T18 tones. If T18 appears too dark and not white, or if T15 and T16 are also white, then redo the preset, choosing a lighter or darker “just white” value. A lack of tone in T17 is not necessarily critical and may not require a preset redo, as it can be adjusted in the plot, but T16 should have a definite tone. If T1 is much brighter than T0, or if T3 is the first discernible tone, then redo the preset, selecting a lighter or darker “just black” value.
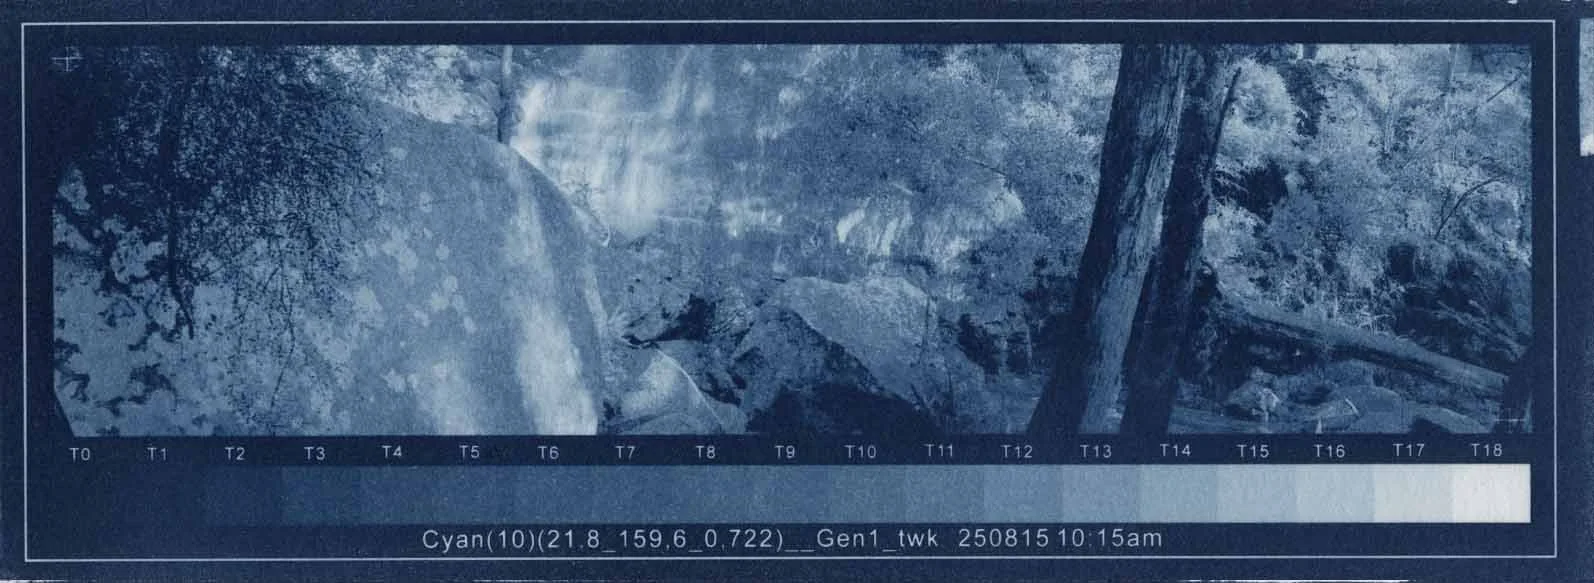
In the cyanotype, T1 is just discernible, T18 is clean, and T17 is carrying some tone; therefore, the parameters are OK.
Overall, when compared with the original, even though there is a smooth, continuous tone from paper white, the highlights are too bright and lack contrast; similarly, although the Dmax is good, the shadows are too light when compared with the original image.
This is reflected in the Cyanotype stepwedge. When compared with the image stepwedge, it can be seen that the T3, 4, and 5 tones are too light, as are the T13, 14, and 15 tones.
The printed stepwedge should be symmetrical around the T9 and T10 tones; that is,the tones should feel balanced on either side of T9 and T10. If it feels that the centre tone is to the left of centre, the midtone is too light; if it feels to the right, it is too dark. If the highlights and shadows are well balanced but the print appears too dark, the midtone is probably too dark. Conversely, if the print is too light, the midtone is too light.
In the example, the tones seem evenly balanced around T9 and T10.

To darken T16 to T15, align the vertical hairline cursor on the T16 grid line and the horizontal hairline at the intersection of the yellow preset plot and the vertical positive T15 grid line, as this is the negative value that created the T15 tone on the print, and click the left mouse button.

Similarly, to darken T4 to T3, align the horizontal T3 hairline with the intersection of the preset plot and the positive T3 grid line, then click the mouse.

Gradually smooth out the new curve, making sure that the control points are not altered and that the curve passes through the existing T9 and T10 points to maintain the existing midtone.


Finish the curve and save it by clicking on or just below the clear film line, which is always the last point entered.
The before-and-after prints are shown below to the left.